
Tuần qua mình có vài dự án mới phải setup nên giờ mình mới có chút thời gian để viết bài tiếp cho blog 😀 Trong bài này chúng ta sẽ tìm hiểu xem cụ thể Sendy là gì? Amazon SES là gì? Đánh giá khách quan nhất về phần mềm Sendy. Chắc hẳn bạn đã biết Email Marketing là gì rồi, nó là một vũ khi siêu lợi hại cho bất kể một ai làm Marketing dù là ở thời nào đi nữa. Sendy là một phần mềm dùng để gửi Email Marketing thông qua dịch vụ Amazon SES.
Amazon SES là gì?
Amazon SES là một dịch vụ SMTP server cho gửi email marketing với số lượng lớn có giá thành rẻ và chất lượng tốt nhất hiện nay (giá chỉ 0,1$/1000 email), tốc độ gửi rất nhanh, khả năng vào Inbox luôn cao và đặc biệt là phương thức thanh toán tiện lợi (bạn chỉ cần nạp trước tiền vào thẻ giống như SIM điện thoại, gửi bao nhiêu Amazon sẽ tự động trừ trong thẻ bấy nhiêu).
Sendy là gì?
Sendy là một phần mềm Email Marketing giúp bạn gửi email thông qua máy chủ Amazon SES với chi phí rẻ nhất hiện nay – 10.000 email/1 đô.
Bạn có thể truy cập trang chủ của Sendy tại đây: https://sendy.co/
Trước đây khi chuyển qua dùng Sendy khoảng 1 năm trở lại đây thì tôi đã dùng qua rất nhiều dịch vụ Email Marketing khác có cả miễn phí lẫn trả phí như Mailchimp, Getresponse, Benchmark, VerticalResponse, Active Campaign, Sparkpost,…
Một số dịch vụ Email Marketing:
- Mailchimp: Miễn phí cho mailing list dưới 2.000 Subscribers. Đây là dịch vụ mà hiện rất nhiều doanh nghiệp ở Việt Nam đang dùng; Ví dụ trong thương mại điện tử thì có Tiki, Lazada (dùng cho một vài dịch vụ nhỏ).
- Benchmark: Một dịch vụ khác tương tự MailChimp, miễn phí 14.000 email/tháng cho list có dưới 2.000 subscribers.
- Nhiều dịch vụ Email marketing khác: Tương tự như Mailchimp cũng miễn phí một số lượng hạn chế email/danh sách có số email khiêm tốn như iContact, GetResponse, Constant Contact…
- Mandrill: Từng miễn phí hơn 10.000 email/tháng nhưng sau khi được Mailchimp mua lại thì đã không còn miễn phí. Đây là dịch vụ gửi mail qua SMTP và bạn sẽ không quản lý được danh sách Subscribers trực tiếp trên tài khoản Mandrill.
- Sendgrid: Vẫn đang miễn phí 12.000 email/tháng và dịch vụ này tương tự như Mandrill chứ không giống MailChimp hay Benchmark. Có thể dùng Sendgrid kết hợp với Sendy để tiết kiệm chi phí.
- Còn rất nhiều dịch vụ khác.
Xem thêm Top 3 phần mềm Email Marketing miễn phí chuyên nghiệp nhất hiện nay.
Với việc sử dụng Email Marketing như một công cụ không thể thiếu cho việc kiếm tiền online hay cụ thể hơn là Affiliate Marketing (tiếp thị liên kết) thì việc lựa chọn để gắn bó lâu dài là điều quan trọng với tôi. Trải qua rất nhiều dịch vụ thì tôi thấy Getresponse là công cụ tốt nhất từng trải về các tính năng (thích nhất tạo được luôn Landing Page và các mẫu Email) nhưng nói thật là so với nhiều bạn thì nó có cái giá khá chát. Getresponse có giá thấp nhất là $15/tháng với danh sách dưới 1000 người đăng ký, $49/tháng với 5000 người và $165/ tháng với 10,000 người. Thật sự với danh sách số người đăng ký rất lớn trong 6 năm làm Affiliate Marketing của tôi thì việc bỏ ra số tiền hàng tháng rất lớn, tính ra thì rất tốn kém.
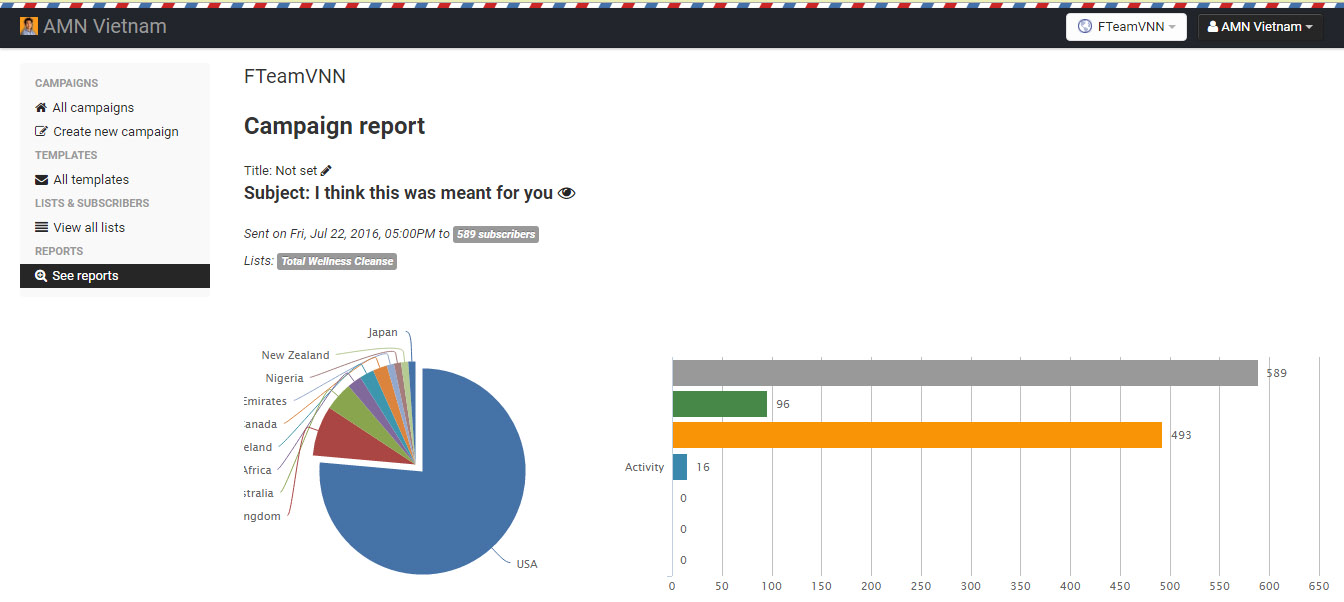
Đánh giá Sendy – Phần mềm gửi Email Marketing giá rẻ
Nhược điểm của rất nhiều dịch vụ email marketing hiện tại là chi phí gửi email số lượng lớn hàng tháng của bạn sẽ tăng rất nhanh khi số lượng Subscribers tăng lên. Sendy giúp tôi cắt giảm chi phí đi rất nhiều lần so với các dịch vụ đó và bây giờ tôi đang tin dùng nó đã hơn một năm.
Với MailChimp, bạn sẽ mất một khoản phí 80 USD/tháng để duy trì một danh sách 10.000 Subscribers. Ngược lại, khi dùng Sendy thì mail sẽ được gửi qua Amazon SES. Và tất nhiên số người đăng ký sẽ không bị giới hạn, rất thoải mái khi kết hợp Amazon SES và Sendy đúng không nào.
Để sử dụng Sendy thì bạn phải mua với mức phí trả duy nhất là $59, được hỗ trợ và cập nhật trọn đời nên số tiền này mình nghĩ rất ok rồi. Bạn có thể mua sendy tại đây và mình sẽ hướng dẫn cài đặt Sendy ngay bên dưới hoặc nếu không muốn mất công tìm hiểu thì có thể sử dụng DỊCH VỤ CÀI ĐẶT SENDY ĐẢM BẢO.
Điều kiện để sử dụng Sendy
Ok, vậy là bạn đã hiểu qua được Sendy là gì và cách thức hoạt động của nó rồi. Tóm lại để bạn có thể sử dụng Sendy gửi email thông qua dịch vụ Amazon SES của Amazon thì bạn cần lưu ý những điều kiện sau:
- Phần mềm Sendy: Tất nhiên rồi, bạn phải mua phần mềm Sendy để bắt đầu nhé!
- Tài khoản Amazon SES: Đăng ký một tài khoản Amazon SES thì bạn mới có thể sử dụng dịch vụ được của Amazon nhé. Sau khi đăng ký và chờ xác nhận của Amazon (bao gồm nâng hạn mức gửi email) thì mất khoảng vài ngày là ok.
- Tên miền + hosting: Bạn nên biết, Sendy sẽ có chức năng Autoresponse, một chức năng gọi có thể coi là đáng dùng nhất của Sendy với email marketing, là một chức năng tự động xử lí một tác vụ thông qua hành động của khách hàng thông qua việc cài đặt trước của người gửi email. Ví dụ lên lịch gửi email tự động chẳng hạn. Vì vậy cần có một hosting để chạy Sendy 24/24 mà không phải là trên máy tính chúng ta. Và cần một tên miền để truy cập dễ dàng đến hosting đó. Bạn có thể sử dụng các loại tên miền dạng: domain.com, sub.domain.com, domain.com/sendy.
Vậy là để có thể sử dụng Sendy thì bạn phải chuẩn bị khá là nhiều thứ, đây là điểm hạn chế mà nhiều người ngại ngần sử dụng nó nhất là những bạn không biết nhiều về kỹ thuật. Nhưng nếu bạn vẫn muốn sử dụng Sendy thì bạn có thể dùng Dịch vụ cài đặt Sendy của mình. Bạn chỉ việc sử dụng còn cài đặt cứ để mình lo. Chắc chắn một điều bạn sẽ thích cho mà xem 😉
Update: Hiện tại do quá bận nên mình tạm dừng dịch vụ cài đặt sendy. Nhưng có thắc mắc bạn cứ comment dưới bài viết mình sẽ trả lời nhé!
Update 2: Mình đã mở lại dịch vụ cài đặt Sendy. Bạn nào cần thì liên hệ dưới comment mình sẽ liên hệ lại nhé!
Hướng dẫn cài đặt Sendy
- Open the file →
includes/config.phpin any text or code editor - Set the compulsory settings (installation URL and MySQL credentials)
- Set the optional settings only if you need (MySQL port and character set)
- Upload all files to your server.
- Make sure the .htaccess file (from the main directory), is uploaded to your server as well (may be hidden if you’re using a Mac).

Image, attachment and CSV uploads requires the /uploads/ folder’s permission to be set to 777.
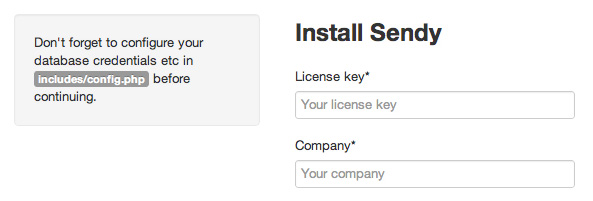
- Visit your Sendy installation. If you uploaded Sendy to http://yourdomain/sendy, visit this link to install.Note: If your installation page fails to load, visit http://your_sendy_installation_url/_compatibility.php?i=1 to see which extensions are not installed for PHP on your server and request your host to install it.
- Your License key is included in the email sent to you after you made your purchase.
- You’ll be asked to specify your Email and Password. These will be your login credentials for Sendy.
- You can fill in your AWS Access Key ID and AWS Secret Access Key later if you have not signed up for Amazon Web Services yet (we’ll cover this in the next step).
- Click the Install now button to proceed.
In order to use Amazon SES, you need to signup for an Amazon Web Services (AWS) account.
- Visit Amazon Web Services (AWS) and sign up for an AWS account.
- Once signed up, you need to retrieve your ‘Access Credentials’ from your AWS account. These are the set of “keys” to allow Sendy to send emails via your Amazon SES account. Start by creating an IAM (Identity and Access Management) user in your IAM console.
Click the Create New Users button:
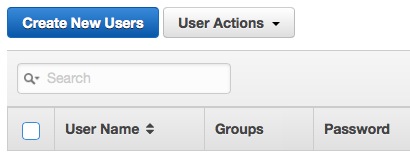
- Type “sendy” in the first field, then click the Create button.

- Copy your Access Key ID and Secret Access Key from the screen that follows and paste it in Sendy’s Settings > Amazon Web Services Credentials. Save your Settings in Sendy then return to your IAM console to close the credentials window.

- IMPORTANT: Do not skip the remaining steps, otherwise your quota will show up as zeros in Sendy.
You now need to “Attach Policy” to your Access Credentials to allow Sendy full SES access.
In your IAM console, click on “sendy”.

In the next page, click on the ‘Permissions’ tab, then click the Attach Policy button.

- Search for AmazonSESFullAccess, then click the checkbox next to the AmazonSESFullAccess item. Then click Attach Policy at the bottom of the screen.

- You’ve successfully created your Access Credentials, saved it in Sendy and allowed Sendy full access to Amazon SES.
IMPORTANT: Before continuing, ensure that the drop down menu at the top right of your SES console displays the same region as what is set in your Sendy main Settings under 'Amazon SES region'.In order to start sending bulk emails, you need to verify your sending emails or domains and increase your SES Sending Limits.
- Verify your sending email address in your Amazon SES console > Verified Senders > Email Addresses. Say you’re going to use
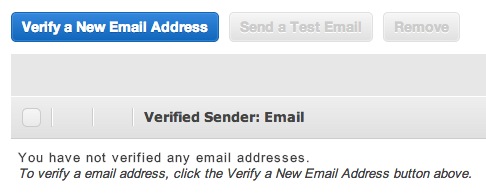
[email protected]to send newsletters in Sendy, verify[email protected]in your SES console. Click the Verify a New Email Address button and follow the instructions.
Tip: If you want to send from any email address belonging to a particular domain without having to verify each email address, verify your sending domain instead (see #2 below). - To verify your sending domain, go to your Amazon SES console > Verified Senders > Domains. Then click the Verify a New Domain button and follow the instructions. By verifying your sending domain, you can send from any email address belonging to this domain without verifying them in #1.
Note: Do not verify your domain with ‘www’ prepended to your domain. Eg. if your domain ismydomain.com, verifymydomain.comand notwww.mydomain.comunless your emails looks like this[email protected](which is rarely the case).

- Now, you’ll need to request Amazon to increase your SES Sending Limits to get your Amazon SES account out of “sandbox mode”. You’ll then be able to send to and from any email address as well as raise your daily sending limits from 200 per day to a number you need.
IMPORTANT: Before continuing, ensure that the drop down menu at the top right of your SNS console displays the same region as what is set in your Sendy main Settings under 'Amazon SES region'.Amazon SNS is required to track bounces & complaints. If an email bounced, the email address will be flagged in Sendy so that future newsletters won’t be sent to them again. To make this possible, here’s what you need to do:
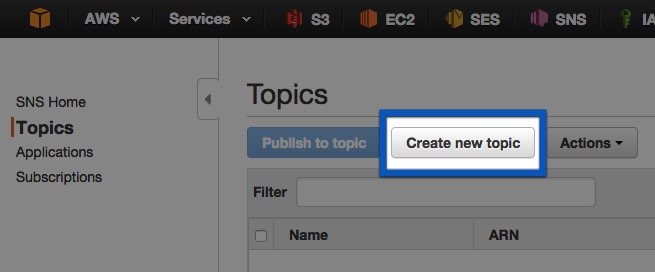
- Go to your SNS console, click Topics on the left sidebar, then click the Create new topic button.
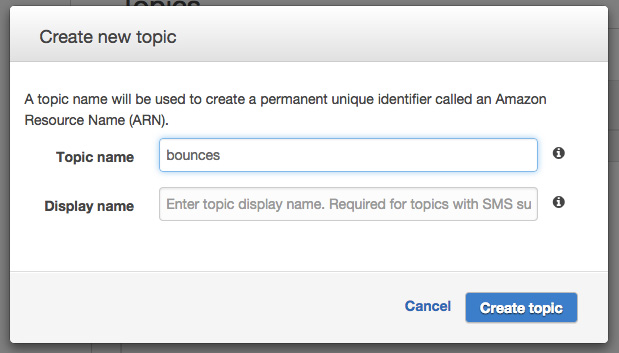
Name it bounces and leave the Display name blank, then click the Create topic button.
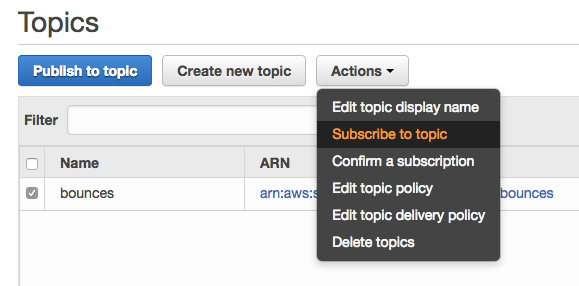
- After creating the topic bounces, click the ‘bounces’ checkbox then click the Actions button, then click Subscribe to topic.
- Now you need to populate the Endpoint field. Let’s say you installed Sendy on
http://yourdomain/sendy/, your Endpoint will behttp://yourdomain/sendy/includes/campaigns/bounces.php. In other words,includes/campaigns/bounces.phpshould be appended at the end of your installation URL.

Click the Create subscription button. Sendy will instantly confirm the subscription. - Go to your Amazon SES console > Verified Senders > Email Addresses and click on the email you attempted to verify. If you verified a domain, go to Amazon SES console > Verified Senders > Domains and click on the domain you attempted to verify.
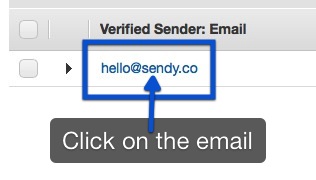
- Under ‘Notifications’, click Edit Configuration.

- Under ‘SNS Topic Configuration’, click the Bounces drop down menu and select bounces (which is what you’ve created previously in your SNS console).
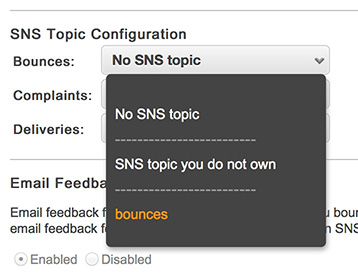
- Repeat #5 to #7 for every email and/or domain you’ve previously verified in your SES console.
- Done! All email bounces will now be tracked and handled when you send emails in Sendy.
IMPORTANT: Before continuing, ensure that the drop down menu at the top right of your SNS console displays the same region as what is set in your Sendy main Settings under 'Amazon SES region'.If a user marks your email as spam, they will be flagged in Sendy so that future newsletters won’t be sent to them again.
The following steps to setup complaints handling are identical to bounce handling in the previous step:
- Click Create new topic in your SNS console.
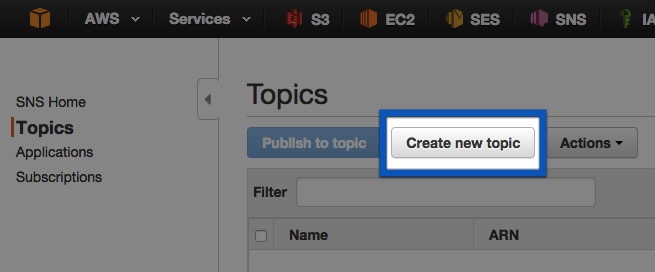
Name it complaints and leave the Display name blank, then click the Create topic button.

- After creating the topic complaints, click the ‘complaints’ checkbox then click the Actions button, then click Subscribe to topic.

- Now you need to populate the Endpoint field. Let’s say you installed Sendy on
http://yourdomain/sendy/, your Endpoint will behttp://yourdomain/sendy/includes/campaigns/complaints.php. In other words,includes/campaigns/complaints.phpshould be appended at the end of your installation URL.

Click the Create subscription button. Sendy will instantly confirm the subscription. - Go to your Amazon SES console > Verified Senders > Email Addresses and click on the email you attempted to verify. If you verified a domain, go to Amazon SES console > Verified Senders > Domains and click on the domain you attempted to verify.

- Under ‘Notifications’, click Edit Configuration.

- Under ‘SNS Topic Configuration’, click the Complaints drop down menu, scroll down and select complaints (which is what you’ve created previously in your SNS console).

- Repeat #5 to #7 for every email and/or domain you’ve previously verified in your SES console.
- By now, you should have setup bounces and complaints for every verified email and/or domain.
Congratulations! You’re all set up.Log in to your Sendy installation and start adding your first Brand. What are brands? Let’s just say you own this company called Apple Inc and you have several products under it eg. Mac, iPhone, iPad etc. These several “child” products are what we refer to as ‘brands’. With brands, you can also setup accounts for each of your clients. Optionally send them a password to login and send newsletters on their own at a price you set.Going forward, for any ‘From email’ you want to use in Sendy, you need to verify either the email address OR its domain via your Amazon SES console (see Step 6). After which make sure to complete Step 7.5 to 7.7 and Step 8.5 to 8.7 (watch this 15 secs video) after verifying your ‘From email’ or its domain to ensure ‘bounces’ and ‘complaints’ handling are working when you send out a campaign.
Sendy – Phần mềm Email Marketing giá rẻ
Bạn sẽ không bao giờ hối hận vì sử dụng Sendy – Phần mềm Email Marketing giá rẻ, mình đã sử dụng hơn một năm và tối ưu hoá số tiền hàng tháng cho Email Marketing rất nhiều. Nếu có vấn đề về cài đặt bạn đặt bình luận dưới bài viết nhé! À, đừng quên sử dụng Dịch vụ cài đặt Sendy của tôi nếu bạn thấy việc cài đặt phức tạp và mất thời gian của bạn.
Chúc may mắn!

Tham gia cùng 67,322 người đăng ký
Nhận thông tin khi có bài viết đặc biệt, hướng dẫn chuyên sâu và cập nhật mới.
Mọi thông tin đều được mã hóa và bảo mật.


dịch vụ cài đặt phí như thế nào?
mua qua link ref thì phí 5$ còn không mua qua link ref thì 11$ bạn nhé!
Anh check Email hộ em ạ! Em mua qua link rồi, chuyển tiền qua rồi anh cài giúp em.
ok, đã rep!
Chào Cường.
Sendy này bạn cài trên hosting hay VPS .
Cám ơn Cường nhiều.
Hosting hay VPS đều được nhé! Nếu anh không muốn quá phức tạp thì cứ hosting cho khoẻ. 😉
Anh ơi cho em hỏi tí là mình chỉ dùng chức năng autogetbonder thì có mất phí không ah
Nó tích hợp trong luôn chứ em? Không mất phí thêm. Còn lại gửi email thì mất tiền thôi em, autogetresponse thì nó cũng phải gửi mail mà. Nhưng mà chẳng đáng kể đâu. $0.1/1000 email cơ mà.
Bạn hiện còn sử dụng dịch vụ này thường xuyên không? Và nó hoạt động ổn chứ? Mình thấy có nhiều người chia sẻ bản Crack, không cần mua. Bạn có kinh nghiệm gì cho việc này cho mình xin lời khuyên nhe!
Hoạt động ổn bạn nhé! Nếu bạn gửi và dùng số lượng lớn và lâu dài thì nên mua sử dụng, nó tiết kiệm và nhất là sử dụng Amazon SES thì độ trust cao lắm. Áp dụng vài kỹ thuật viết email nữa và cấu hình tốt thì không có chuyện vào spam box nhé
amazone ses nó bảo sau 24 h nó xác nhận mà e vẫn chưa được nó bảo lại là gặp lỗi We received an error while confirming the payment method associated with your Amazon Web Services account. To use some Amazon Web Services, you must provide a valid payment method. Please update your payment method information at the following page: https://console.aws.amazon.com/billing/home#/paymentmethods Some common reasons why an authorization might fail are: * Amazon is not set up to accept the CVV2 security code associated with credit cards. Your bank may be able to temporarily lift this requirement. * The authorization is… Xem thêm >>
Mình cần cài đặt. Muốn dùng dv từ a-z vủa bạn luôn. Liên lạc vs bạn thế nào vậy
mình muốn dùng thử sendy một thời gian rồi mua nó thì làm thế nào nhỉ? chắc nhờ bạn cài đặt luôn.
Mua thôi 😉
Em chào a Cường. Anh ơi, Sendy này nghe nói cài trên hostinf chập chờn lắm, có phải vậy ko anh. Anh cho em hỏi thêm là bên anh có dịch vụ hỗ trợ nâng hạn mức Amazon Ses không ạ, nghe nói bữa nay khó xin lắm huhu. Anh rep em với nha.
a dùng hosting vẫn dùng tốt mà nhỉ. @@ Em dùng hosting bên nào?
dạ em định dùng Hawk host, nhưng anh Luân bên trang canhme.com khuyên ko nên dùng vì hay đứng campaign, dùng VPS thì tốt hơn, em cũng ko biết sao nữa @@.
À anh Cường ơi, bên team anh có dịch vụ hỗ trợ nâng hạn mức Amazon SES ko anh. Em nghe nói bữa nay khó xin lắm, VN đi đâu cũng bị liệt vào danh sách đen :((
Bạn Cường hỗ trợ mình cài đặt Sendy với. Mình ở Hà Nội, mình tìm không thấy số điện thoại của bạn. Bạn cho mình số hoặc gọi mình 0903.217.187 nhé.
Em ngừng dịch vụ rồi anh ạ.
Mình mới sử dụng Sendy, trước đây mình dùng SendSerialSmart
SSS thì gửi rất nhanh và ko bao giờ bị gián đoạn giữa chừng
Nhưng Sendy mình gửi không hiểu sao bị Stop liên tục và cứ phải Resume lại bằng tay
Bạn có thể hướng dẫn mình cách khắc phục lỗi này không. Nếu là lỗi time out thì mình không tin vì host bên mình dùng rất nhẹ, đặc biệt vào buổi tối hoặc ngày nghỉ thì rất hiếm có người truy cập vào
Thanks!
Hồi xưa mình cũng dính, sau chuyển qua VPS là hết. Quan điểm cá nhân mình thì lỗi do hosting thường bị time out dù điều này làm bạn không vui 😉
Anh Cường cho em hỏi, em có 1 web chạy Magento 2, vừa mua Sendy rồi, mua extension “SMTP Email Settings for Magento 2″ cho Magento rồi, nhưng không biết làm sao cài đặt vào.
Anh có thể gợi ý giúp em cách cài, hoặc em dùng dịch vụ cài đặt Sendy bên anh cho nhanh được không ạ?
a dừng dịch vụ cài đặt rồi em nhé
Em hiểu là anh dừng dịch vụ rồi ạ. Em chỉ muốn hỏi một chút, không biết kết nối Sendy với Magento thì có lưu ý gì không anh ạ.
Anh chưa thực hiện trên Magento. Nếu em cần thì a nhờ bạn kỹ thuật bên a xem giúp cho.
Chào bạn, mình muốn sử dụng duchj vụ cài đặt. Bạn liên hệ lại với mình nhé. Cảm ơn bạn nhiều.
Chào bạn. Mình muốn dùng dịch vụ cài đặt của bạn. Bạn liên hệ lại với mình qua email nhé. Cảm ơn bạn nhiều.
Mình muốn sử dụng dịch vụ cài đặt sendy, bạn tư vấn giúp mình nhé 0989363008